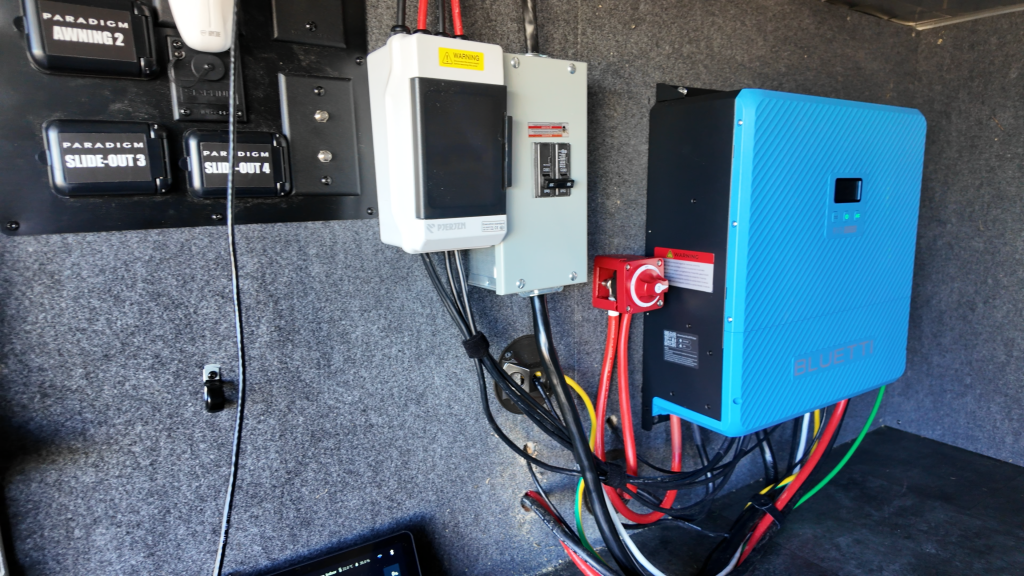
So, we stirred up some controversy. A few weeks ago, we revealed that instead of installing a $14,000 Victron system like we had in our previous RV, we installed the brand new Bluetti RV5 in our Alliance Paradigm—a completely different 48V system that cost half the price.
And let me tell you, people had opinions. A LOT of opinions.
If you missed that installation video and want to see what everybody’s debating about, check it out here.
But here’s the thing—all the debate in the world doesn’t matter until we actually live with this system. So we spent 4 days off-grid doing real-world testing, running everything we normally run.
It’s time to settle this once and for all: Can the Bluetti RV5 actually replace a Victron system, or did we just make a $7,500 mistake?
The Test Parameters: 4 Days at Harvest Hosts
We decided the best way to test our new solar setup was to go completely off-grid for four days. No hookups. No cheating. Just real-world, full-time RV living powered entirely by our new system.
Our plan? Travel to multiple Harvest Host locations across Ohio—wineries, farms, and unique spots you’d never find at traditional campgrounds. If you’re not familiar with Harvest Hosts, they offer incredible 1-4 night stays at member properties, and it’s honestly so much better than crowded RV parks or Walmart parking lots.
Want to try it yourself? Get 20% off any Harvest Host membership with code LIKETHERES20—their deepest discount! Sign up here.
Before We Left: Alliance RV Stop & Some Tweaks
Before hitting the road, we stopped at Alliance RV in Elkhart to get a few things addressed on our new rig. They fixed our pantry door (which had been taped shut—not ideal!), and addressed our main entry door issue.
However, we did discover that our bathroom pocket door is still giving us trouble. It got stuck again after the repair, so we’ve got a ticket open to hopefully get that resolved without replacing the entire door mechanism.
The Freshwater Fill Frustration
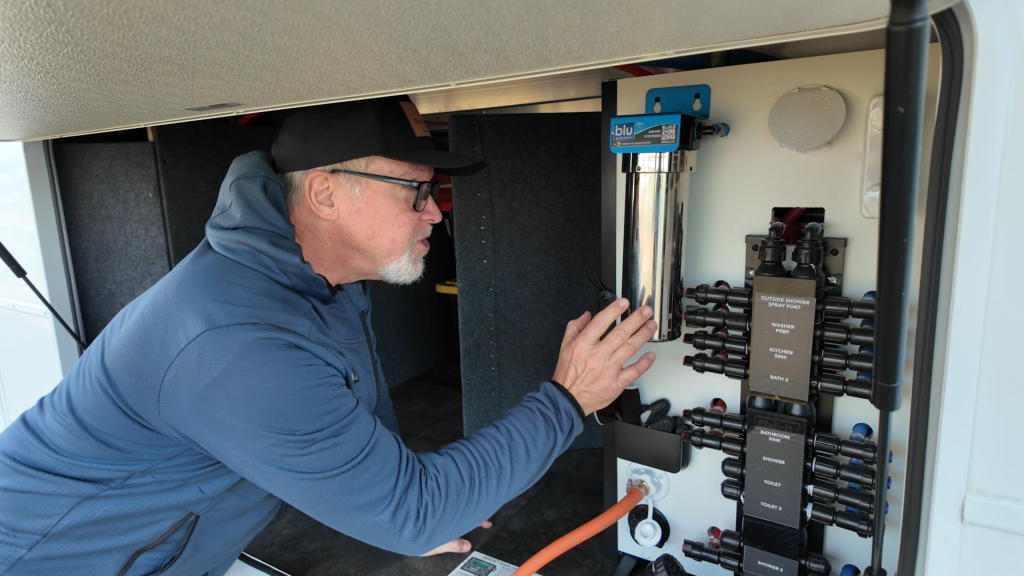 One thing that’s been a challenge with our Alliance Paradigm is the manifold system for filling the freshwater tank. Unlike our previous Valor, which had a simple Nautilus panel, this system requires:
- Turning a valve behind the access panel (way in the back of the bay)
- Making sure it’s pointed toward the yellow indicator
- Dealing with extremely slow water flow
Barry suspects we’ve got a flow restriction issue—possibly from the combination of our new water softener plus the factory-installed blue water filter. The tank was taking forever to fill, which is frustrating since we fill our freshwater tank frequently for boondocking.
We actually ran into Rob the RV guy (an RV tech) who was parked nearby, and even he was initially confused by the system! He confirmed we were doing it right, but the slow flow is definitely an issue we need to address.
The bottom line: Having to empty the entire bay just to access that valve every time we need to fill water at a rest stop is incredibly inconvenient. Barry’s already scheming with ChatGPT on how to reroute that valve to the front of the panel for easier access.
Our eBike Setup: etrailer to the Rescue
 Let’s talk about our bike situation, because we made some fantastic upgrades thanks to etrailer.com.
The Hollywood Bike Rack
We have electric foldable eBikes now, but we kept our heavy-duty Hollywood Bike Rack from our previous setup because Barry also has a traditional mountain bike. This rack is built to handle heavy loads (our old Rad eBikes were 70 lbs each!), and it’s been absolutely solid.
Currently, we’re running one eBike and Barry’s mountain bike on the rack, which works perfectly for our needs.
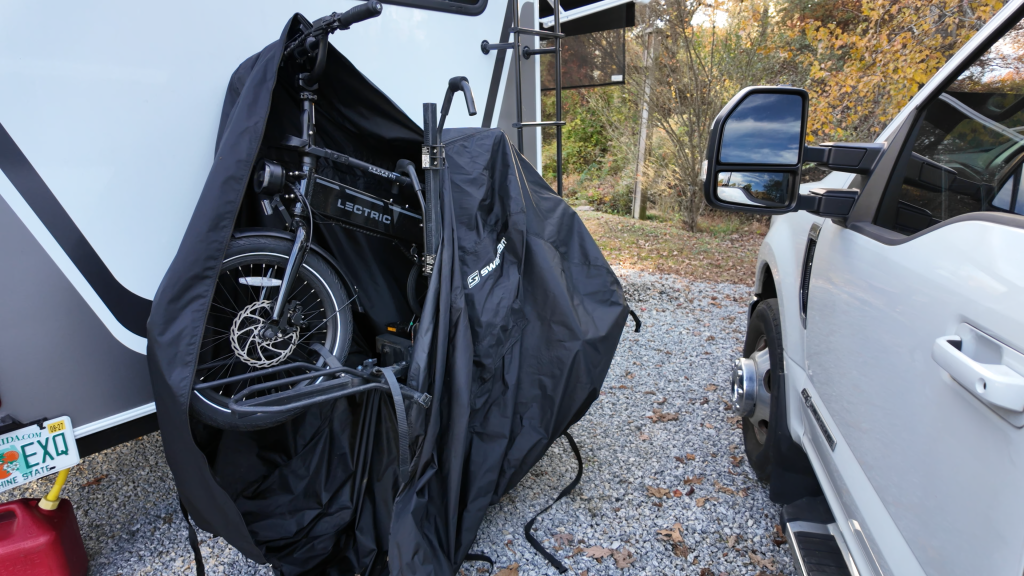
The Swagman Bike Cover
One of the best additions we made is the Swagman Bike Cover. This thing is genius.
Here’s how it works:
- It has a big zipper that goes over the top of the hitch
- There’s a hole for the hitch itself
- You leave the back portion on when the bikes are off (just let it hang)
- When you mount the bikes, zip it up and strap it closed
Why we love it:
- Keeps the bikes clean from all the road gunk during travel
- Provides a theft deterrent—out of sight, out of mind
- Weather protection
Our Foldable eBike Storage Solution
For our other foldable eBike, we’re using a storage bin solution that some of our amazing viewers suggested. The foldable eBikes can be a bit unruly when you fold them down, so putting them in a bin:
- Keeps them contained and secure
- Saves space in the bay
- Makes them easy to carry inside the RV
That’s right—we store one eBike inside the RV in the unused space between the slides. It’s so much easier than taking up precious bay space.
The bonus? We actually bought two bins. When we want to take the bikes on an excursion in our truck, we just load both bins with the folded eBikes and slide them right into the truck bed. No need to remove the heavy-duty rack from the RV and reinstall it on the truck. It’s all about making things streamlined and easy!
Why We Choose etrailer Over Amazon
I have to give a shoutout to etrailer’s customer service. When I was trying to figure out how to properly install the bike cover, I:
- Found a detailed installation video on their website
- Called and actually talked to a real person (refreshing these days!)
- Got expert advice on which bike rack would support our heavy eBikes
This is the difference between etrailer and Amazon. With Amazon, I can’t tell you how many times I’ve messaged sellers with questions and never heard back. With etrailer, you get real support from people who know RVs and understand what you need.
That’s why I always check etrailer first for RV parts and accessories—the customer service alone is worth it.
Day 1: American Winery & Brewery- Our First Test
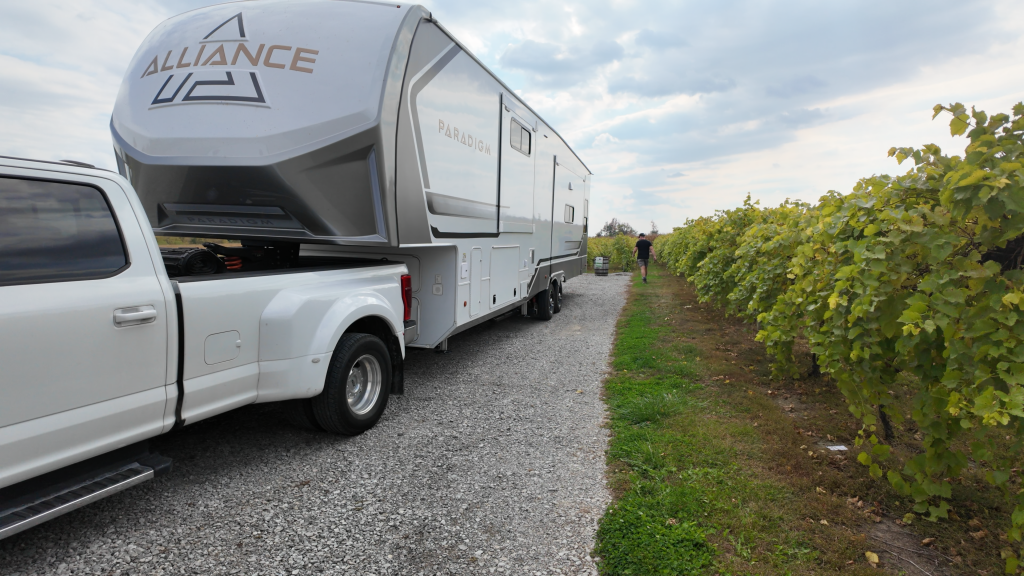 We arrived at our first Harvest Host location—a beautiful winery in Ohio. The weather was decent, sunny, and we were excited to see how the system would perform.
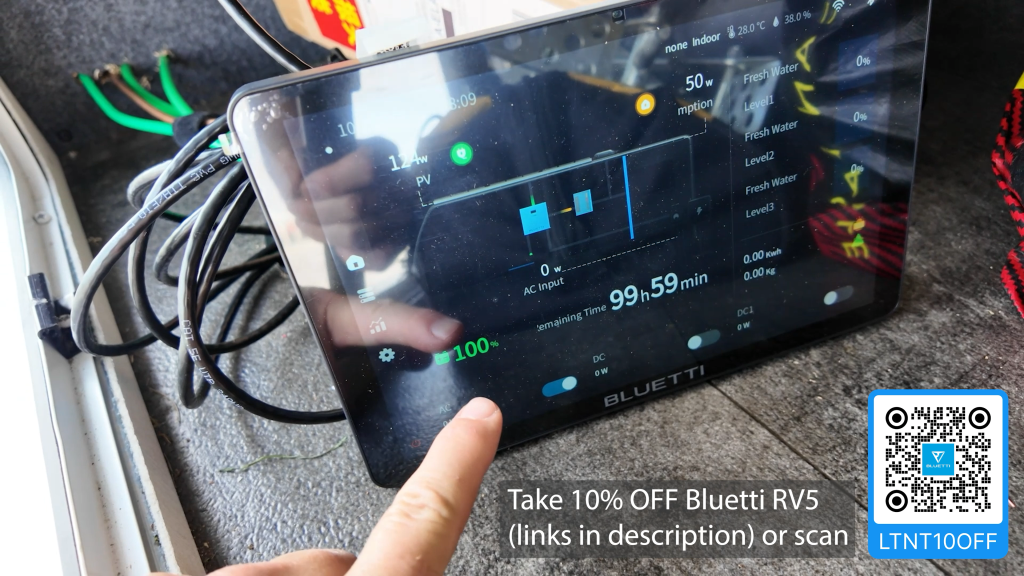
Initial Battery Status
When we arrived, we were at essentially 100% battery (the display shows 99 hours and 59 minutes, which we think is just the maximum reading). The solar panels were bringing in about 130 watts from the roof, and we were only using about 54 watts since we didn’t have the air conditioning running.
Important note: Our DC loads (12V systems) aren’t connected to the RV5. Barry chose to keep the existing setup with our Redodo 280 amp-hour lithium battery powered by the factory-installed 400-watt solar panel. This handles things like our 12V refrigerator.
Get an additional 6% off Redodo batteries with code LIKE at checkout.
The Redodo was sitting at about 71% when we checked it, and with the sun out, we expected it to charge back to 100% by bedtime.
Setup Challenges
The site was reasonably level—we thought we’d need our leveling blocks, but after checking with our level, we realized we could handle it with just the automatic leveling system. Much easier than driving onto blocks!
We did have a minor crisis when our awning somehow got caught and wouldn’t retract properly. After some investigation (and mild panic about potentially needing $150 in repairs), Barry figured out the issue—the awning arms were too close to the edge and got caught when we tried to retract. Crisis averted with some manual adjustment!
Day 1 Evening: Watching the Weather
As evening approached, we could see storm clouds rolling in. The forecast showed rain all day the next day, which would be our first real test of the system without significant solar input.
We went to bed with the batteries fully charged, knowing that Day 2 would tell us a lot about whether this system could handle cloudy conditions.
Day 2: The Cloudy Day Challenge
 Day 2 was exactly what the forecast predicted: cloudy and rainy all day long. This was the ultimate test.
Our Power Usage
Even without being particularly careful, we ran:
- TV all evening (until about 10 PM)
- Barry’s laptop with dual monitors
- Internet/WiFi
- Coffee maker in the morning
- Microwave at least once
- Regular lighting and outlets
- The RV5 inverter itself (which draws power to operate)
By mid-afternoon, we were down to about 40% battery.
Breaking Out the Generator
With no sun and our batteries dropping, we decided to run our generator for a couple of hours. This is exactly the kind of scenario we wanted to test—what happens on those inevitable cloudy days when solar just can’t keep up?
The result? The generator pumped in about 1,500 watts while we were only using about 300 watts, so it charged the system back up relatively quickly. We ran it for maybe two hours (basically one tank of gas) and felt good going into the evening.
What We Learned
The system handled the cloudy day fine, but it confirmed what we already knew: without sun, you need a backup plan. For us, that’s a generator. For others, it might be moving to a different location or plugging into shore power for a night.
The key takeaway: The RV5 performed exactly as expected. No surprises, no failures, just the reality of solar power on a cloudy day.
Day 3: Back to Sun & New Adventures
Day 3 brought the sun back, and we moved to our second Harvest Host location—a rock climbing facility in Toledo!
This was one of the coolest Harvest Host experiences we’ve had. The owner and her husband are also RVers (and former Harvest Host guests themselves), so they totally understand the lifestyle. The property has an outdoor climbing wall, and we got to test our skills (spoiler: Barry is much better at this than I am!).
Solar Performance Returns
With the sun back out, our system was charging beautifully. This is exactly the scenario where solar shines (pun intended)—sunny days with moderate power usage equals happy campers.
The Climbing Wall Experience

Barry crushed it on the climbing wall, making it look easy. I gave it a shot too, though I was definitely slower and didn’t make it as far up. But that’s what made this Harvest Host so special—it wasn’t just another winery or brewery. It was a completely unique experience we’d never have had at a traditional campground.
The location itself: You’re right in the Toledo area, convenient to everything you need, with just some road noise during the day. The owners were incredibly welcoming, and we’d highly recommend this spot to anyone passing through the area.
Day 4: The Final Test & A Big Discovery
 Our last day brought us to our fourth Harvest Host location and some important realizations about our power system.
Water Tank Check-In
After four days of not being particularly careful with our water usage, here’s where we stood:
- Freshwater: Down to 1/3 (still had water left!)
- Black Tank 1: Showing full (but we think the sensor needs cleaning since it showed full right after dumping)
- Black Tank 2: 2/3 full
- Gray Tank 1 (kitchen): 2/3 full
- Gray Tank 2 (shower): Barely used since we didn’t shower much
The verdict: Four days is totally manageable with our tank capacity, and we weren’t even being conservative. In our old Valor, we could go a week and a half, and we expect similar performance here since the tanks are roughly the same size.
The Overnight Power Drain Issue
Here’s where things got interesting. Barry made an important discovery about our power setup.
The situation: We used the generator the night before to bump our batteries from 50% to 70% before bed. When Barry woke up in the morning, we were back down to 50%.
That’s a 20% overnight drain with minimal usage—just:
- The furnace kicking on occasionally (it was cold, we keep it at 63°F at night)
- Our 12V refrigerator running
- The inverter itself drawing power
The Problem: An Unintended Power Loop
Barry figured out what was happening, and it’s a great lesson for anyone considering a similar setup:
The issue: By keeping the Redodo 12V battery system separate from the RV5, we created an inefficient power loop:
- The 1,600 watts of solar panels feed the RV5’s 48V batteries
- The RV5 inverts that stored DC power into AC power for the RV
- The RV’s factory converter then converts that AC power BACK into DC power to charge the Redodo battery and run 12V loads
- This conversion loop wastes significant power
Barry’s realization: “I’m basically using up all this power that I shouldn’t be. It’s a loop.”
The Solution: Consolidate Everything on the RV5
Barry’s now seriously reconsidering the decision to keep the Redodo system separate. His plan:
- Run ALL 12V loads through the RV5’s DC output
- Eliminate the conversion loop
- Potentially reduce overnight drain from 20% to 15% or less
Why this matters: That 5% difference might not sound like much, but over time it means:
- Less generator runtime (less fuel cost)
- More buffer for cloudy days
- Better overall system efficiency
It’ll require rewiring work, but Barry’s up for it. This is exactly why we’re doing these tests—to figure out the optimal setup through real-world experience.
The Verdict: Did We Make a Mistake?
 After four days of living completely off-grid with the Bluetti RV5, here’s our honest assessment:
What Worked Great ✅
The System Itself
- The RV5 handled our daily power needs without issue
- The inverter ran our AC loads smoothly
- Charging from solar was efficient and automatic
- The generator integration worked perfectly when needed
- The touchpad display made monitoring easy
Real-World Performance
- Sunny days: No worries at all, batteries stayed topped up
- Cloudy days: Expected drop, but manageable with generator backup
- We ran everything we normally use without restrictions
- No system failures or shutdowns
The Off-Grid Lifestyle
- Harvest Hosts provided amazing, unique locations
- No campground fees for four days
- Beautiful, quiet settings (mostly)
- Total freedom and flexibility
What We’d Change 🔧
The DC Power Setup
- The separate 12V battery system creates inefficiency
- The conversion loop is wasting power overnight
- Consolidating everything on the RV5 makes more sense
- More rewiring work ahead, but worth it
RV-Specific Issues (not system-related)
- Alliance Paradigm water fill system is inconvenient
- Bathroom pocket door still problematic
- Some bay organization still needed
So… Was It a Mistake?
Absolutely not.
The Bluetti RV5 performed exactly as we hoped. For half the cost of our previous Victron system, we’re getting comparable off-grid capability with the added benefit of:
- Easier DIY installation
- All-in-one design (inverter, charge controller, distribution in one unit)
- Excellent monitoring and control
- Expandable if we want more capacity later
The reality check: Solar power has limitations regardless of what system you use. Cloudy days mean less power. That’s just physics. But with proper planning (and a generator as backup), it’s totally manageable.
Who is this system perfect for?
- Full-time RVers who boondock regularly
- People who want robust solar without the premium Victron price tag
- DIY-minded folks willing to do their own installation
- RVers with realistic expectations about solar limitations
Who might want something different?
- People who need to run multiple ACs constantly while off-grid (though we’d argue: upgrade to efficient ACs instead of oversizing your battery bank)
- Those who want unlimited expansion capability
- RVers who prefer professional installation
What’s Next?
Barry’s already planning the next phase:
- Rewiring the DC loads to run through the RV5
- Eliminating the power conversion loop
- Optimizing the system for maximum efficiency
- More boondocking adventures to continue testing
We’ll be documenting all of this, of course. If you want to follow along as we refine this setup and continue our off-grid adventures, subscribe to our channel and join our email list.
Resources & Links
Ready to Go Off-Grid?
If you watched our videos and you’re thinking about upgrading your own solar setup, we’ve got an exclusive discount for you! The Bluetti RV5 is the system Barry installed—if you haven’t seen the full installation breakdown yet, check out that video here for all the details.
Get 10% OFF the Bluetti RV5: Use THIS LINK with coupon code: LTNT10OFF
Our Favorite RV Gear:
🔧 etrailer.com – Your one-stop shop for RV parts & upgrades with actual customer service!
Products Featured in This Video:
- Hollywood Bike Rack – Heavy-duty rack for eBikes and mountain bikes
- Swagman Bike Cover – Weather protection and theft deterrent
🔋 Redodo Lithium Batteries – Get 6% off with code LIKE
🍷 Harvest Hosts – Get 20% off any membership with code LIKETHERES20
🎓 Our Full-Time RV Living Course – Everything you need to know about transitioning to full-time RV life
Final Thoughts
Four days off-grid confirmed what we hoped: ditching Victron for the Bluetti RV5 was the right move for us.
Is the system perfect? No—but then again, neither was our $14,000 Victron setup. The difference is we spent half as much, installed it ourselves, and we’re getting the off-grid capability we need for our lifestyle.
The minor inefficiency Barry discovered with the DC power loop is easily fixable and honestly a great learning experience. This is the beauty of being full-time RVers who aren’t afraid to tinker and optimize.
The bottom line: If you want to boondock regularly, need reliable off-grid power, and don’t want to spend $14,000+ on a traditional setup, the Bluetti RV5 is absolutely worth considering.
Have questions about our setup or the off-grid lifestyle? Drop them in the comments below, and Barry will do his best to answer!
Until next time, keep living like there’s no tomorrow!
—Darlene (and Barry)
Disclosure: Some links in this post are affiliate links, which means we may earn a small commission if you make a purchase. This helps us create more content for you at no extra cost. We only recommend products we actually use and trust. The Bluetti RV5 system was provided to us for review, but all opinions are our own honest assessment based on real-world testing.